E24 | Tile Soap Holders; Swirl Ceiling | Ask This Old House
Season 24 Episode 24 | 23m 42sVideo has Closed Captions
Replacing vintage ceramic toothbrush and soap holders; patching a swirl ceiling crack.
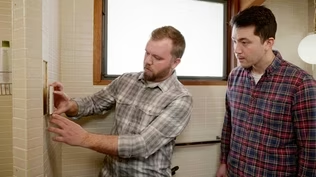
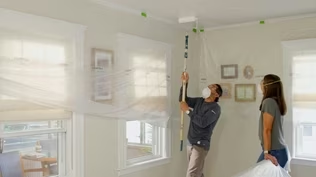
Nathan Gilbert upgrades a bathroom by removing vintage wall-mounted ceramic toothbrush and soap holders and replacing them with a more functional, modern wood shelf. The team plays "What Is It?" as they guess the purpose of a small metal bar. Then, Mauro Henrique repairs a water-damaged ceiling crack, demonstrating how to match the original swirl texture for a seamless finish.
Problems playing video? | Closed Captioning Feedback
Problems playing video? | Closed Captioning Feedback
Funding for Ask This Old House is provided by The Home Depot, Renewal By Andersen, and ChipDrop.
Support provided by:


E24 | Tile Soap Holders; Swirl Ceiling | Ask This Old House
Season 24 Episode 24 | 23m 42sVideo has Closed Captions
Nathan Gilbert upgrades a bathroom by removing vintage wall-mounted ceramic toothbrush and soap holders and replacing them with a more functional, modern wood shelf. The team plays "What Is It?" as they guess the purpose of a small metal bar. Then, Mauro Henrique repairs a water-damaged ceiling crack, demonstrating how to match the original swirl texture for a seamless finish.
Problems playing video? | Closed Captioning Feedback
How to Watch Ask This Old House
Ask This Old House is available to stream on pbs.org and the free PBS App, available on iPhone, Apple TV, Android TV, Android smartphones, Amazon Fire TV, Amazon Fire Tablet, Roku, Samsung Smart TV, LG TV, and Vizio.
Keep Exploring


This Old House Insider Newsletter
Get This Old House exclusive stories, tips, and behind-the-scenes information delivered right to your inbox every month.Providing Support for PBS.org
Learn Moreabout PBS online sponsorship♪♪ Kevin: On "Ask This Old House," our experts travel across the country to answer questions about your house.
♪♪ Today, when a homeowner wants to add storage to their bathroom, Nathan steps in to give it a facelift.
Jenna: This changed the game.
It looks so good.
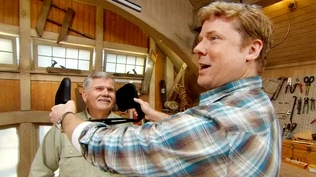
Kevin: Then the crew gets together for a round of "What is it?"
Ah, now they're coming.
And Mauro helps a homeowner patch a textured ceiling.
Mauro: Stretch it down a little more.
Kevin: On "Ask This Old House."
♪♪ Jenna: Hi, Nathan.
Welcome.
Nathan: Hi, Jenna.
Nice to meet you.
Jenna: So nice to meet you.
I'm so excited you're here.
Nathan: Beautiful home you have here.
Jenna: Thank you so much.
We've updated some things in the kitchen and the living room, but what I'm going to show you today is our bathroom.
Okay, Nathan, welcome to my bathroom.
Stuck in the 1960s.
Nathan: Here it is.
Jenna: So we're not ready for a full remodel, but I am eager to get these ceramic tiles off.
I think these used to hold things like bar soap.
Nathan: Bar soap holder.
Toothbrush holder.
Jenna: Toothbrush.
Nathan: Yep, yep.
Jenna: But now, you know, we use electric toothbrushes.
I prefer liquid soap.
And this vanity is smaller, so it starts to get cluttered.
So my dream would be to somehow get these off and add a shelf or something in this area.
Nathan: Definitely.
Yeah, we can do that.
Jenna: Amazing.
Nathan: So remove the toothbrush holder, the bar soap holder.
I think it looks like we might have to remove this towel bar here, right?
Nice wooden shelf.
Plenty of storage on it.
Little organizer underneath.
Um, to get started, let's remove these to see what kind of space we need to cover with that wooden shelf.
Jenna: Okay.
Nathan: I'll get some tools and we'll get started.
Jenna: Awesome.
Can't wait.
Looks great.
Good to go.
Nathan: We are ready to go.
So I'm going to attempt to take these off in one piece.
But first we have to play a guessing game, right?
So there's a few different ways that these could have been installed.
It could have been a little bit of mortar on the back applied and then grouted around.
It could have been a tile on the back of it, like a four and a quarter by four and a quarter profile.
That way it kind of works into the layout.
Um, again, mortar than grouted or it could be like a cavity on the backside, a cavity in the wall and they stuffed some newspaper in there and kind of just made everything bond.
But I think it's the second one.
I think it has like a tile on the back of it.
To get these off, I'm going to use a scoring tool.
It has a really sharp carbide tip on it, and I'm going to try and ease out all the grout, all the way around it, get a pry bar in there, and pop it off in one piece.
Alright.
So as we thought, kind of the tile profile, four and a quarter by four and a quarter, essentially is on the back of this toothbrush holder.
Looks like they set it with some mastic back in the day, which was pretty common.
Alright, while we're here, I'm going to remove some of this old adhesive.
With a sharp chisel.
Alright, Jenna, you want to do the next one?
Jenna: Yeah.
Let's do it.
Nathan: Alright, here we go.
So a lot of control.
Nice easy scoring.
Pull towards you and just work your way all the way around.
Jenna: Okay.
Nathan: As you can see, those big pieces fall right out.
Jenna: Excellent.
And when do I know like, okay, that side's good, I can stop scraping?
Nathan: I think when you pull and you don't feel any resistance.
Jenna: Okay.
Nathan: That sounds good.
Alright, let me grab that hammer and pry bar.
You stand here, we'll switch places and you can pop it off.
So again, control is the most important thing.
So we're going to set this pry bar right here on that corner.
So you have a little bit of room to swing over the towel bar and just light gentle taps.
I'll hold this if you want to swing.
Jenna: And the point of being, like, gentle is gentle so it doesn't crack?
Nathan: I just don't want to smash it.
Jenna: Okay.
Nathan: I can't resell it if I break it.
Yeah.
One more.
Alright, I'm gonna give it a little pry.
There it is.
Alright.
Here, you take over.
Jenna: Okay.
Nathan: I'll take that.
Pry it off.
Jenna: And when I pry it, I should pull this towards me?
Right?
Nathan: Perfect.
Jenna: Like a glove.
Nathan: Nice.
Alright.
So now we'll get the sharp chisel and we'll clean up all that.
that mastic that's left behind.
Alright, let's jump over here and same process.
Jenna: Okay, great.
Whoo!
[ Laughs ] That was great.
Nathan: Alright, so we got our demo done.
Now we can start talking about that new shelf.
Jenna: Okay, great.
Nathan: So, you have a 24-inch vanity below.
So I always like to work off a center line.
Um, just holding this up, 16 is on the center line.
I'll cover all three holes if I make a shelf that's 32 inches wide.
Jenna: Okay.
Nathan: I think that'll be nice.
Lots of storage.
And then you have a little bit of a void that's four and a quarter tall.
So if I made a five-inch shelf, we'll cover everything across 32 inches wide.
I see some gold accents around the room.
Jenna: Amazing.
Nathan: Try and introduce some of that.
Jenna: That'd be great.
Nathan: Then I'll find something to cover up that hole.
Jenna: Okay.
Nathan: And you'll be good to go.
Jenna: I'm so excited to see this.
This is awesome.
Nathan: Alright.
I'm gonna go make a shelf real quick.
Jenna: Okay, great.
[ Laughs ] Nathan: Alright, here it is.
Jenna: It is perfect, I love it.
Nathan: I'm glad you like it.
So we have a quarter-sawn white oak.
Jenna: Okay.
Nathan: With a warm satin finish.
Some of those nice gold brackets and a little jewelry organizer here on the bottom.
Jenna: Amazing.
Nathan: Some pre-drilled holes for when we mount it.
So we're going to get it into place and we need to do a layout first.
You know we want to put it about there to cover those three holes.
Jenna: Yeah.
Nathan: But we still kind of want to work off of a center line.
Jenna: Okay.
Nathan: So let's get some painter's tape on the wall so we don't lose any of our marks.
And let's do a layout.
Let me throw one more just a little bit above.
Jenna: And what is this to do?
Nathan: This is just going to help with our layout.
So we're writing on tile, which doesn't really want to take pencil very well and I don't want to do it -- I don't want to do it with ink on the tile if we're not going to be drilling it out.
Jenna: Okay.
Nathan: So we have our 24-inch vanity, right?
Jenna: Mm-hmm.
Nathan: 24.
So we have 12 inches.
I can make just a little tiny mark down here.
Then I want to transfer that up.
Alright, so we have a 32-inch top.
So we'll do a little mark 16 inches in for our center.
Alright.
So we can bring our piece up, match up our center lines.
But one thing I'm picking up on is it looks like we have a little bit of a hump in the wall, which is -- it happens in every house.
So when I fasten, I'll probably split the difference, go equal-equal instead of pulling one side tight or the other side tight.
Jenna: Oh, okay.
Nathan: So we'll just split the difference on that.
I think the last thing I want to do is also -- I'm going to do... I'm going to do a line for a height because we have this old grout line here.
Jenna: Mm-hmm.
Nathan: And I'd probably want to be just a little bit above it.
So that way we don't land on it and then you have a little groove behind.
Jenna: Oh, smart.
Nathan: So to level it, we're going to use a torpedo level.
Jenna: Okay.
Nathan: That looks nice and level right there.
Still above it.
Jenna: Mm-hmm.
Nathan: Alright.
That'll be the top of our shelf.
Now that we have center line, we have a top line.
I'm going to need you to hold it.
And you're going to kind of be watching the top.
Okay?
Jenna: Okay.
Nathan: We're going to use this marker that has a very long end to it that we can reach into that hole and transfer our layout.
There's our two dots, and that's where we need to put our anchors.
And typically when you think of an anchor like this, you think of it like spreading on the backside of the drywall.
Jenna: Yeah.
Nathan: But in this case, you're going through tile and you're going through drywall.
So it's not really going to like wing out like that.
It's more just going to expand a little bit and fill up the void and allow somewhere for the screw to fasten into.
[ Drill whirring ] This is a carbide tip.
Some are diamond-tipped and it's good to go with the masonry.
If you used a wood drill bit, you'd have a hard time getting through this glazing that's on top of the ceramic tile.
So some guys used to take a nail and like kind of chip that away.
But any time you drill through tile, you run the risk of breaking it.
Alright, let's see how we did.
Jenna: So what we're looking for now is that no tile cracked?
Nathan: No tile cracked and a nice, nice, clean hole.
Alright.
Jenna: Well done.
Nathan: Now we're ready to put our anchors in.
Jenna: So why do we use anchors?
Nathan: So the anchor helps us put a fastener where we want it.
So you probably have a stud here or here, but that's really not really going to work because our shelf comes to here.
There's a bracket here.
I don't know if I can hit a stud, and we probably have a stud maybe around here somewhere.
So it's like we -- using a shield that allows us to put the fastener exactly where we want.
Jenna: Okay.
Nathan: So we're going to put this in and then we're going to tap it until it's seated.
So that one's good.
Alright.
We're almost ready to mount our shelf.
So let's talk fasteners.
So I picked up these number 10 brass screws.
They're 2 1/2 inches long.
And that'll be nice because we have to pass through the oak shelf into our anchor.
Alright.
The last thing I want to do is just adjust these screws just a little bit, just to make sure that they're kind of aesthetically pleasing and they're all clocked in the same direction.
Jenna: That's great.
I would have never thought to do that.
It makes a difference.
Nathan: Those look good.
Alright.
Now we need to address that towel bar.
I picked up one of these hooks I was planning on putting here, but that's not going to work out.
So what do you think if I introduced a second one?
I made a really nice quarter-sawn white oak board, and we mounted it the same way that we mounted the shelf.
I mounted the hooks onto that and then mount that to the wall, and we'll hide that hole and you'll have some good usable hooks.
Jenna: That is a great idea.
I love it.
Nathan: Alright.
I'm gonna go make that.
Jenna: Great.
♪♪ ♪♪ Nathan: You are quite the decorator.
Jenna: Nathan, this came out amazing.
I can't thank you enough.
I absolutely love it.
Nathan: I'm glad you like it.
Jenna: And look, I can now keep my toothbrush right there.
But I wanted to ask you because I don't want to ruin it.
Is this water-resistant?
Can I put things on there that might be wet?
Nathan: Everything's sealed up, water-resistant.
You can even spray cleaner on it.
Wipe it down.
No problem.
Jenna: Amazing.
And I love how the towel holder over here came out.
It looks so good.
Nathan: Lots of usable space.
Jenna: This changed the game.
Thank you so much.
Nathan: You are welcome.
Nathan: And listen, I wanted to ask you because now I'm inspired with the gold.
Nathan: Yeah.
Jenna: I have to update this faucet.
Do you know anyone?
Nathan: I know a guy.
Jenna: Perfect.
Nathan: I'll call him on the way home.
Jenna: Thank you so much.
Nathan: Alright, take care.
Jenna: Bye, Nathan.
Nathan: Nice to meet you again.
Jenna: Thank you again.
Nathan: Thanks for writing in.
Jenna: Thank you.
Ah!
♪♪ Tom: Alright.
I use the term loosely, but, gentlemen, here's a piece of metal that's bent at a 45-degree angle on one side with a point and a 90-degree angle on the other end.
It's metal about a half an inch wide.
What is it?
Kevin: Mm, mm-hmm.
Me?
Can I go?
Can I go?
Zack: Alright.
Go ahead, Kev.
Kevin: Absolutely 100% I know what this is.
It's a come-along.
Tom: 100%?
A come-along?
Kevin: You know what a come-along is.
Tom: I know that's not a come-along.
Kevin: Oh, this is a come-along.
So we've all got kids, right?
And something happens to them when they become teenagers.
You'll find out.
Anyway, they never listen to you.
They roll their eyes.
You're like, "Come on, let's go."
Tom: They know it all.
Kevin: "Oh, Dad."
So this -- Ah, now they're coming.
Now they're gonna come.
Here they come.
Come on, let's go.
Get in the car.
And then, you know, when you got to take a family photo, I'm like, "Smile!"
Aah!
[ Laughter ] Tom: I think that would work.
But it's not what it is.
That's not what it is.
Mark: Okay.
Zack: I've got to really say, tools have come a long way, but that's not what that is.
Kevin: No?
Mark: It's a [Indistinct] tool.
Zack: You see my fingers, how damaged they are?
Tom: What's up with the tape?
Zack: That's actually not purple tape.
That's, uh, blood blisters from all the years of construction.
But no more will I have that problem because now if I miss when I'm hammering, completely protected.
So you get two or three or seven of these and you're good to go.
That's what that's for.
Mark: Alright, well, that works, but I love nuts.
I mean, I don't know if everybody knew that or not, but I do.
I love almonds, I love walnuts, I love pistachios.
Tom: Pistachios are better for you.
Mark: Yeah.
I know, right?
In the shell, right?
Tom: Yeah.
Mark: That's why I need this.
Boom!
Pistachio.
Tom: That's not it.
Nice try.
Nice try.
Mark: That's not it?
Tom: Alright, well, you guys probably would have got it, but I did -- I have a surprise.
I left out one little part.
Mark: Oh!
Tom: Got it right here.
Mark: We would have got it.
Zack: Yeah.
Oh, that changes everything.
Mark: That does.
Kevin: That's the go claw.
Mark: Where'd you get that?
Tom: Now, this piece Is just bent on one end and nothing on the other end.
Okay, so now, if you ever want to have -- Let me have that siding right there.
Zack: [ Grunts ] Look what we just happened to have.
That's convenient right there.
Tom: So you take the second part of the tool with only the one bend, put it underneath the siding and push down gently.
And you'll notice that the siding bulges out and bends enough so I can slide this other one up and rest it on top of the siding below.
And you create a hook.
So let's say you want to hang something on your wall with this type of siding.
You use that hook.
You don't damage the siding.
You hang whatever you want to hang and you haven't done any damage and you can take it up, put it away, take it out and move it somewhere else, or just use it for another day.
Mark: Wow.
Kevin: That's the nuts.
Tom: There you go.
♪♪ Mauro: Hello.
William: Hey, Mauro.
Thank you so much for coming.
Mauro: Nice to meet you.
How you doing?
William: Good.
How are you?
Mauro: Alright.
Oh, nice house.
William: Yeah.
So we just moved in about a year and a half ago.
Mauro: Yeah?
William: And I just got married two months ago.
Mauro: Wow.
Both house and the wife?
William: Yes.
Mauro: That's a perfect combination.
William: Yeah.
Thank you very much.
Mauro: Alright.
William: So, yeah, it's been pretty busy.
Um, we've got this crack here on the ceiling.
It's a bit of an eyesore.
Mauro: And also some water stain on this ceiling.
Do you have any bathroom or anything upstairs?
William: No bathroom upstairs.
But the roof was leaking.
Mauro: The roof?
William: Yeah.
So we've since had the entire roof replaced.
So that's all taken care of.
Hasn't gotten any worse or anything.
Mauro: Alright.
I also noticed some pattern on that ceiling.
William: Yeah.
My wife and I really like the swirl pattern.
Mauro: Yeah?
William: So if we could keep that, that'd be perfect.
Mauro: We actually can.
Okay, I am going to step out, get some stuff, be back, and we start the work.
William: Great.
Mauro: Alright, Will, the walls are protected.
Floors are protected.
William: Mm-hmm.
Mauro: It's time to open a little bit of the gap so we can start to patch in the ceiling.
Alright?
That's what I'm going to do.
William: And why do we have to do that?
Mauro: We have to open up so we can patch it.
William: So how wide are you trying to get it then?
Mauro: Just about an eighth of an inch.
If you need to go back, go back again.
And the other thing too -- We don't want to disturb the pattern.
William: Right.
Mauro: Alright?
Alright.
Time to prime.
William: So what kind of primer are we using?
Mauro: We're going to use this shellac base primer.
It's a prime sealer for water stains.
Perfect.
Let's start with this area here.
William: So why do we need to use the primer before we patch the crack?
Mauro: Well, number-one rule, everything that hit with the water, water stain on the ceiling, walls or any other area, you should prime it before you paint because if you don't prime, once you put the coat of paint on, the water stain will bleed right through the paint.
William: Really?
Okay.
Mauro: It's like a prime sealer.
You got to seal everything before you paint always.
William: Makes sense.
Mauro: And not only are we priming inside the cracks, Will, we're going to prime all the water stains.
Alright.
You want to take it over?
William: Sure.
Mauro: Alright.
It's all yours.
Just go nice and easy.
Alright?
William: Mm-hmm.
Mauro: Just finish the cracks first.
Right there.
That's good.
William: Alright.
That about enough?
Mauro: Yes.
Once you start to go into the pattern, just follow up the pattern design with your brush.
Alright?
Don't go across.
Just follow the pattern like you're doing the pattern yourself.
Yes.
There we go.
[ Brush rustling ] I even like the sound of the brush going to the patterns.
William: Mm-hmm.
Mauro: Right?
William: Yeah, it's very satisfying.
Mauro: Well, Will, primer is in process drying.
William: Alright.
Mauro: Let's talk about the materials that I'm using in this house.
William: Okay.
Mauro: We have different types of joint compound.
William: Oh.
So this is all joint compound?
Mauro: It's all joint compounds, different times to dry.
William: Mm.
Okay.
Mauro: So over here we have the regular joint compound.
Takes a little longer to dry.
If you're doing the whole ceiling, this is the way to go here because you get a more open time.
And then for repairs, we might use something that dries faster, which is the dry mix.
You put a little bit of water, it will take about 20, 25 minutes to dry.
For a small patch, this is really nice.
And then here we have the popcorn ceiling, which is another texture that you can use on your ceiling.
William: Mm-hmm.
Yep.
That looks just like what we have upstairs.
Mauro: Alright, let's practice.
We're going to apply the wet joint compound.
And then we're going to create that pattern.
William: Okay.
Perfect.
Yeah.
I was hoping we could get a little practice first.
So why would you want to use the wet one for this?
Mauro: Because you have a little more open time to work over your patterns.
William: So we're just building up enough to work with right now?
Mauro: Just build enough to create the pattern.
Now, there's two ways we can do this.
There's this little... This little teeth tools.
William: Mm-hmm, right.
Mauro: Now, you can go like this, curve and come back.
William: Right.
Mauro: Or we can do it with the brush, right?
Which is a thick, a stiff brush.
You start right here.
Go out, make your turn and come back down.
William: Yeah.
That looks more like what we've got above us there.
Yeah.
Mauro: Look at that.
William: Alright.
Mauro: Not a lot of pressure.
William: Okay.
Mauro: Just enough to create the pattern.
William: Mm-hmm.
Mauro: Nice.
William: Should I try another one?
Mauro: Try another one.
Nice.
William: Cool.
Mauro: Alright.
William: It's not so hard.
Mauro: So we're not done yet.
There's another pattern to go here.
So we're going to start -- We're going to get right in between the two of them right here.
You got the first, the second.
And then this -- it's about 50% higher.
William: Okay.
Mauro: And then you're going to go just like this.
Start right in the center and then create the pattern.
William: Should I go counterclockwise like before?
Mauro: You can go whatever you feel more comfortable doing it.
William: I think I'll be the consistent way.
Mauro: Yeah.
Perfect.
Okay.
William: How could I have made that a little bit better?
Mauro: That's part of the pattern.
William: Oh, okay.
Yeah.
Mauro: Look at that.
William: A little bit rough.
Mauro: They're all different.
William: Try redoing one.
Just see what happens.
Mauro: Just follow up the same pattern.
William: Alright.
Mauro: That's great.
It's time for us to patch.
But before, we need to make the mix.
We get the dry compound right in there.
William: So what kind of consistency are we going for here?
Mauro: We don't want it too stiff.
We don't want it too smooth.
We're just going to be right in the middle.
William: Mm-hmm.
Mauro: I think we're good here.
Then you go up like this.
Alright?
And then you start to apply.
Just like that.
William: Okay.
So not too much then.
Mauro: Not too much.
But, you know, try to cover so you can start the filler right in there.
William: Mm-hmm.
Mauro: Alright.
Just like that.
Alright.
Now we'll use the brush.
You're going to follow up the pattern.
Whenever the pattern goes this way, this is where the brush goes.
Okay?
Just like that.
Just going to stretch it down a little more, if you like.
Yeah.
Because the important thing for us now is just that line of crack up there.
That looks good.
Okay, Will, time to paint.
Alright.
You go like this.
What we're using here is a flat water-based paint.
And it was a match from the existing color.
This is a paint and primer in one.
Alright?
You can go any direction you want.
If you want to follow up the pattern, that's fine.
If you want to go side to side like this, it's all fine.
William: So I know we did the primer earlier, but why are we doing paint and primer now?
Mauro: There's two different types of primer.
One was a shellac base that will seal all the water stain on the ceiling.
And this one is a water-based priming paint.
Alright.
It looks dry.
What do you think?
William: How can you tell that it's dry?
Mauro: Well, when you see a little sheen, it means the paint is still wet.
William: Right.
Mauro: When that sheen disappear and goes away, it means the paint is dry and it's ready for the second coat.
♪♪ Okay.
William: It's looking dry.
Mauro: Well, Will, look at that.
William: Yeah.
Mauro: Looks much better than before, doesn't it?
William: I think so.
So is there anything else we need to do at this point?
Mauro: Oh, I think we all set.
Unless you have more work to do?
Anything else?
William: Upstairs we have the same exact crack and the water damage from the roof like before.
But it's a different texture.
It's the popcorn.
Mauro: Popcorn?
William: Yeah.
Mauro: Well, you know how to do it.
Same system.
Just different texture.
William: Right.
Like the demo from before.
Mauro: Absolutely.
You're going to do a great job here and there too.
Alright?
William: Yeah.
This was the harder part.
Thank you very much.
Mauro: Nice to meet you.
Thanks for having me here.
William: Yeah.
Of course.
♪♪ Kevin: Next time on "Ask This Old House," Ross talks about some products that will elevate your outdoor movie night.
Then, do you have questions about your home's insurance policy?
We have an expert on hand to help explain what you should have and what you may not need.
And Tommy revisits an old project when he rebuilds the picnic table at the barn.
All that on "Ask This Old House."


Support for PBS provided by:
Funding for Ask This Old House is provided by The Home Depot, Renewal By Andersen, and ChipDrop.